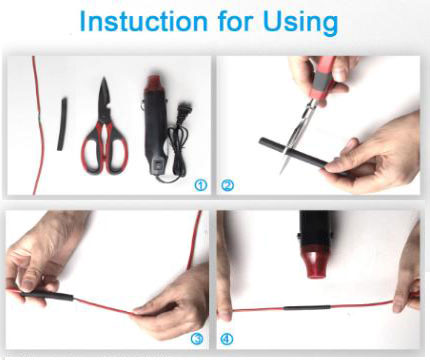
How to Use Heat Shrink Tubing
2025-01-07 17:59Heat shrink tubing is a versatile and essential solution for insulating and protecting wires, cables, connectors, and other components. Known for its durability and reliability, it’s commonly used in electrical repairs and installations. Whether you’re using it to coat new wires or replace damaged insulation, following the proper steps ensures a successful repair. This guide outlines a step-by-step process to repair damaged wires with heat shrink tubing.
Step 1: Measure the Damaged Section of Wire
Begin by measuring the length of the damaged wire that needs to be covered. The tubing should be long enough to fully cover the damaged area, with extra length on both ends to ensure proper sealing. Since heat shrink tubing shrinks slightly in length (up to 10%) during the heating process, consider this factor when measuring.
Step 2: Select the Correct Heat Shrink Tubing Size
Choosing the right size of heat shrink tubing is vital. Use a ruler or caliper to determine the diameter of the damaged wire. Then, select tubing with an appropriate shrink ratio:
For a 2:1 shrink ratio, the tubing’s original diameter should be slightly less than twice the diameter of the wire.
For 3:1 or 4:1 shrink ratios, choose tubing with an original diameter slightly less than three or four times the wire’s diameter. The tubing should slide easily over the damaged area before heating and shrink snugly to provide a secure fit.
Step 3: Cut the Tubing Slightly Longer Than the Damaged Section
Using your measurement, cut a piece of tubing that is at least half an inch longer than the damaged section. This ensures the wire is fully covered with an extra buffer for added protection. Heat shrink tubing is simple to cut using scissors or a knife.
Step 4: Clean the Wire Surface
Before applying the tubing, ensure the wire surface is free of dirt, grease, and debris. Use a lint-free cloth and isopropyl alcohol to thoroughly clean the wire jacket. A clean surface allows the tubing to adhere securely, ensuring a tight seal after heating.

Step 5: Slide the Tubing Onto the Wire
Carefully slide the pre-cut tubing onto the wire, aligning it to completely cover the damaged area. Ensure the tubing extends slightly beyond both ends of the damaged section. The tubing should move smoothly without friction, making positioning easier.
Step 6: Use a Heat Gun or Micro Torch to Shrink the Tubing
Heat shrink tubing requires precise heat to contract and form a tight seal around the wire. Follow these tips for effective heating:
Use a heat gun or micro torch for better temperature control.
Adjust the tool according to the recommended temperature on the tubing’s packaging. If using a heat gun, opt for the deflector nozzle setting to distribute heat evenly. Avoid using open flames like a lighter, as they may overheat or damage the tubing.
Step 7: Apply Heat Evenly
To ensure a uniform shrink, hold the heat source 2–6 inches away from the tubing. Move the heating tool back and forth along the tubing while rotating the wire. This prevents overheating and air bubble formation, allowing the tubing to shrink evenly and securely around the wire.
Step 8: Opt for Colored Tubing
Colored heat shrink tubing can be an excellent way to organize and identify wiring. Color-coding wires simplifies future maintenance and increases safety. Additionally, businesses can use specific colors to reflect branding, enhancing professionalism.
Step 9: Inspect the Finished Repair
After the tubing cools, inspect the repaired section. Ensure the tubing has shrunk tightly and uniformly around the wire without any gaps, bubbles, or exposed areas. If necessary, reapply heat to correct minor issues.
Additional Tips for Success
Practice First: If you’re new to using heat shrink tubing, practice on scrap wires before repairing critical components.
Store Properly: Keep tubing in a cool, dry place to maintain its quality and longevity.
Consider Adhesive-Lined Tubing: For watertight and more durable repairs, use adhesive-lined tubing that provides an additional layer of protection.
Conclusion
Repairing damaged wires with heat shrink tubing is an efficient and reliable process that ensures electrical components' safety and durability. By choosing the right size tubing, cleaning the wire surface, and applying heat evenly, you can achieve a professional-grade repair. Whether for home projects or industrial applications, heat shrink tubing is a dependable solution for wire insulation and protection.
